Subscriptions
The NoPass™ for Customers SaaS solution is available on a fee-paying basis with a 30-days free trial period. Customers such as online businesses or developers can subscribe to NoPass™ on the NoPass.us page where the NoPass™ Admin Console is located.
There are two subscription plans available to NoPass™ for Customers SaaS solution users: a standard plan with a 30-day free trial period and a custom plan to be discussed with the customer on a case-by-case basis.
Subscribe to a standard plan
You can subscribe to a standard plan from the browser both on your desktop computer and mobile device. To complete the Subscription procedure, you will need to perform the following steps as described in more detail below:
1) Define the essential terms of your Subscription (number of users and trial period).
2) Register your Profile or Sign in to your Profile.
3) Complete the Payment procedure following Payment rules.
Depending on the number of users for your Subscription, you can either apply for a 30-day trial period or buy your Subscription immediately.
Subscribe to a Standard plan with a trial period
Procedure:
1. In your browser, go to the NoPass.us page.
Desktop view Mobile view
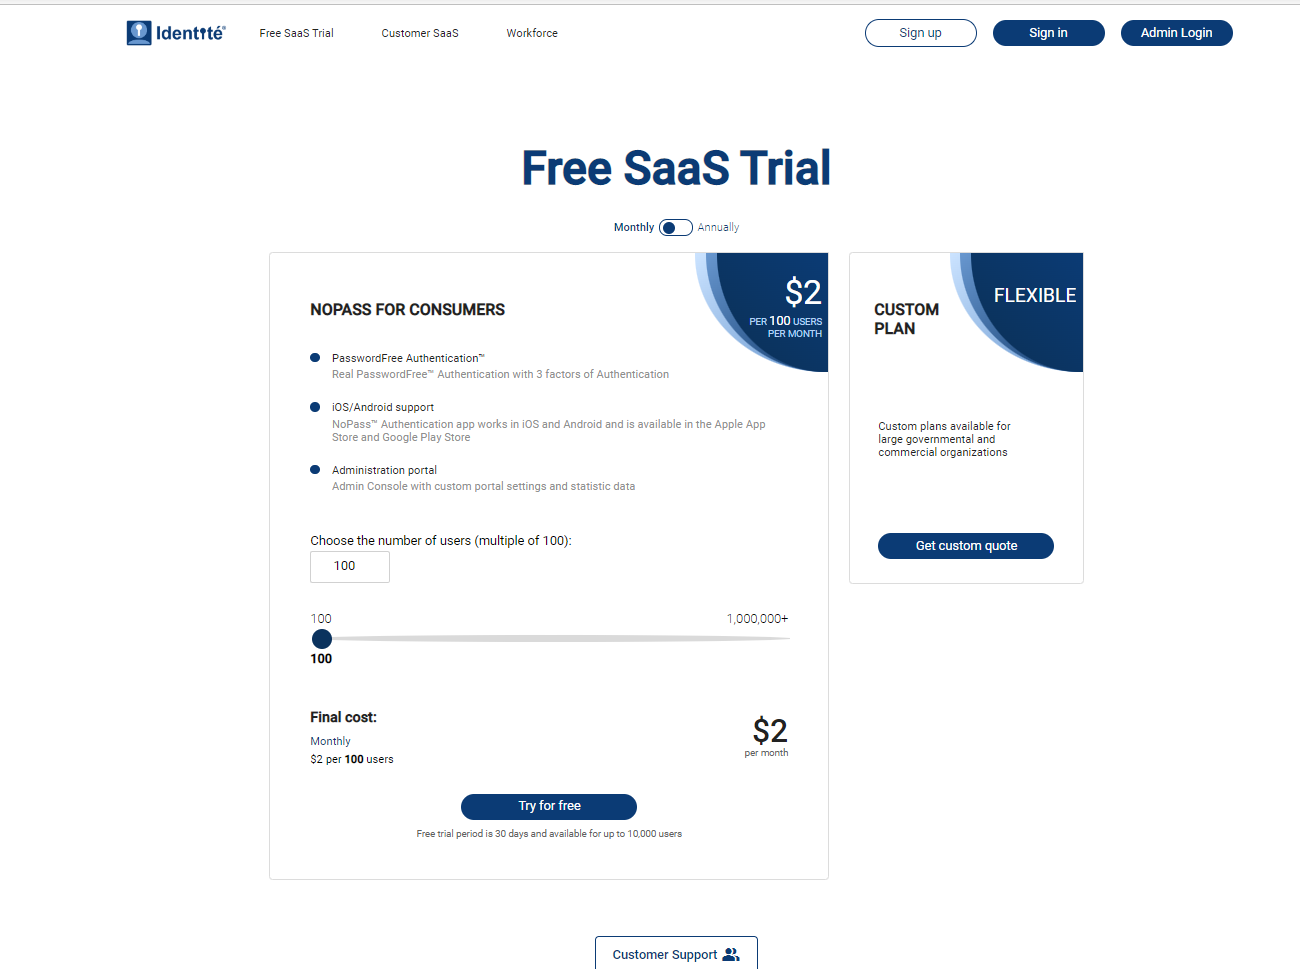
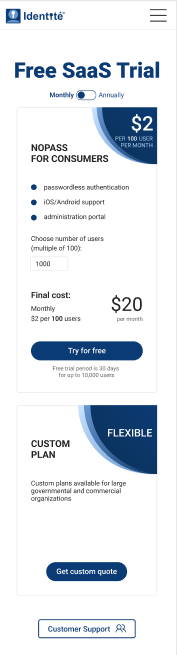
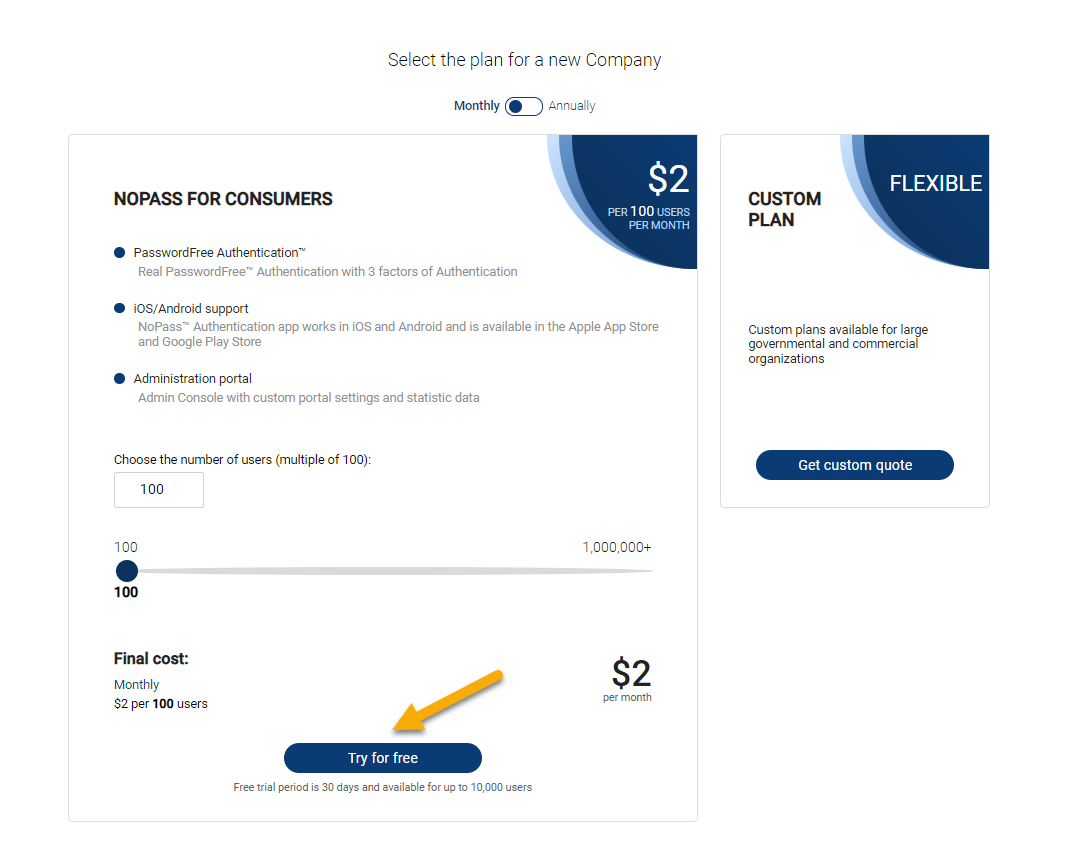
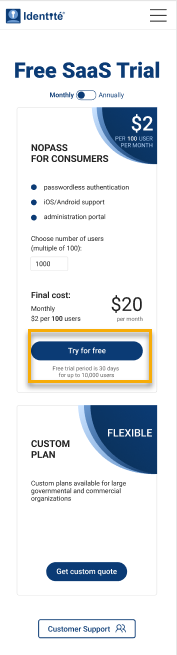
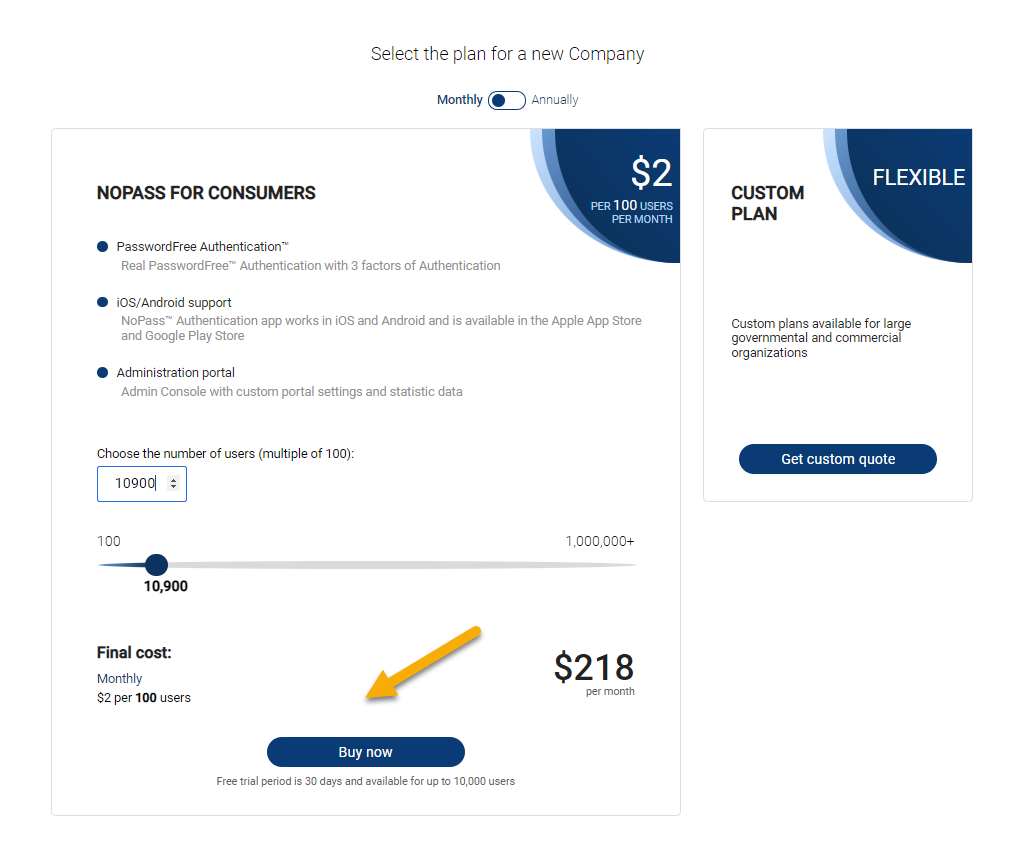
2. Study the information in the NoPass™ for consumers box and set the number of users:
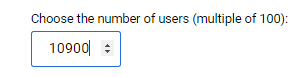
- with the up-down controls or slider on your desktop computer.
Up-down controls Slider

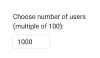
- by entering the number of users on your mobile device.
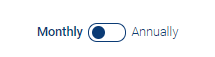
3. Select the type of payment: monthly or annually by moving the toggle.
4. Click or tap Try for free.
Desktop view Mobile view
Create a Profile
Subscriptions are available only after you have created or signed in to your Profile.
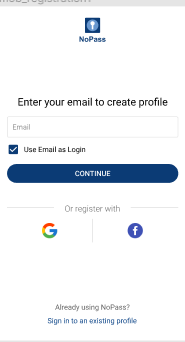
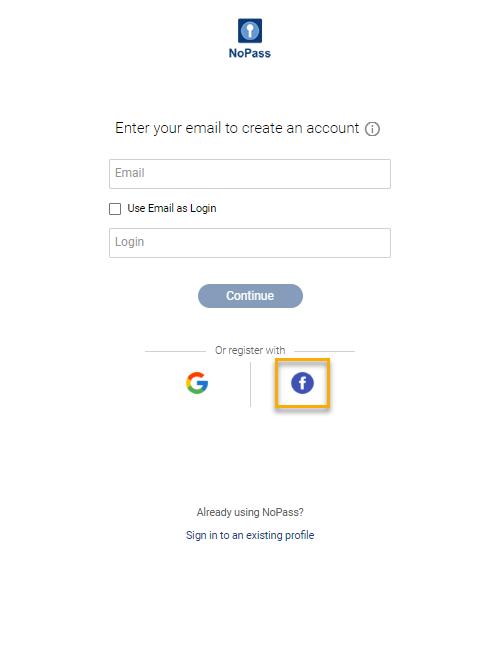
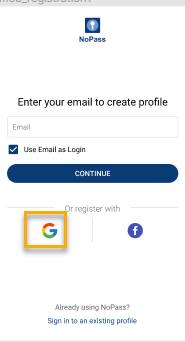
1. To create a Profile, perform one of the following actions.
Desktop view Mobile view
i. On your desktop, perform one of the following steps:
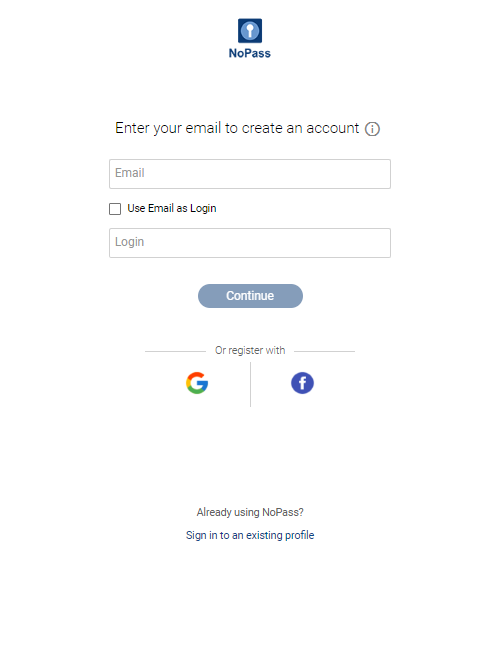
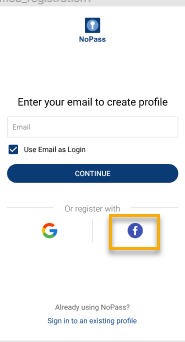
- Fill in the Email field, perform one of the following actions, and click Continue.
- In the Login field, enter a unique login.
- Select the Use Email as Login check box.
- Click the Google icon to register with your Google account and choose the Google account that you plan to use for the Profile creation. Remember that you will have to choose the same Google account to sign in to your Profile in the future.
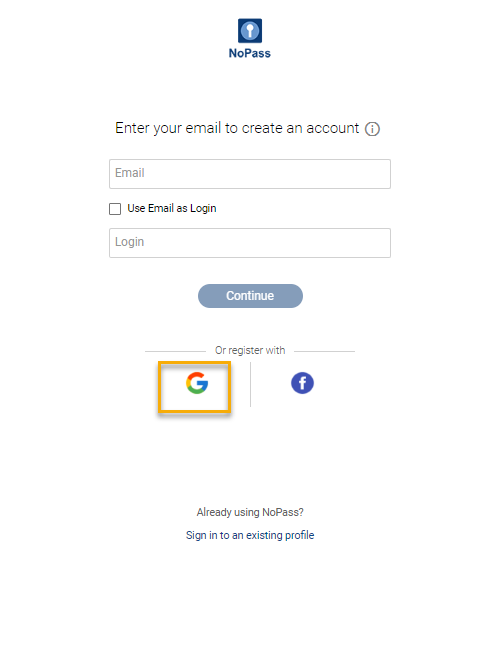
- Click the Facebook icon, sign in to your Facebook account or create a new account. Remember to register your Facebook account with your valid email address, otherwise, your Facebook account won't be available to the NoPass™ app.
ii. On your mobile device, perform one of the following steps:
- Fill in the Email field and tap Continue.
- Tap the Google icon to register with your Google account and choose the Google account that you plan to use for the Profile creation. Remember that you will have to choose the same Google account to sign in to your Profile in the future.
- Tap the Facebook icon, sign in to your Facebook account or create a new account. Remember to register your Facebook account with your valid email address, otherwise, your Facebook account won't be available to the NoPass™ app.
For more details, see Create profile.
2. Check your email box and click or tap the link in the received email message to confirm registration.
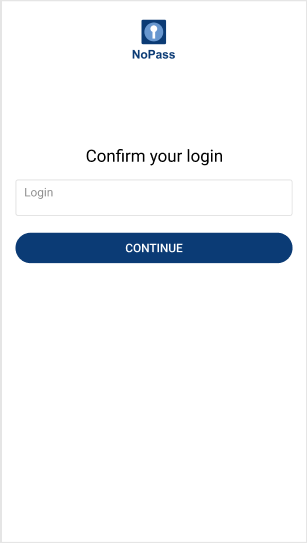
3. On the confirmation page, enter your login and click or tap Continue.
Desktop view Mobile view

4. Perform the following actions:
i. On your desktop computer:
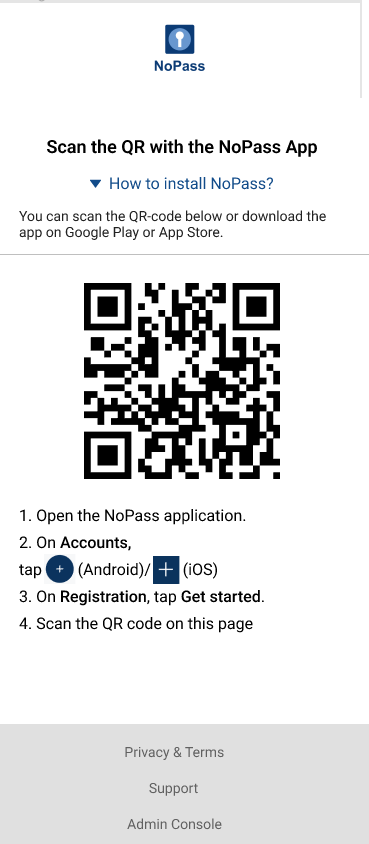
1) Follow the instructions on the page with the QR code.
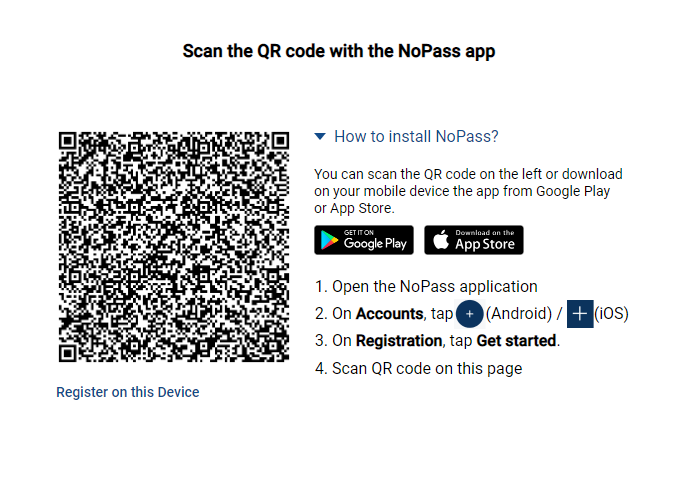
- Open the NoPass™ application on your mobile.
- On Accounts, tap the + sign.
- On Registration, tap Get started.
- Scan the QR code on the page in the browser.
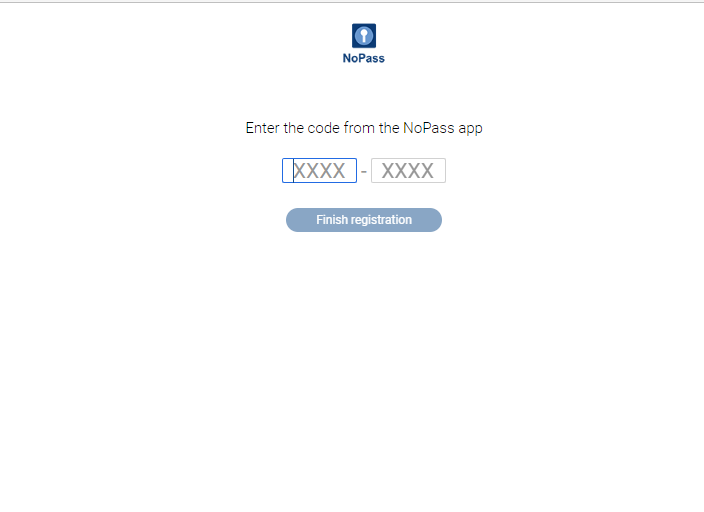
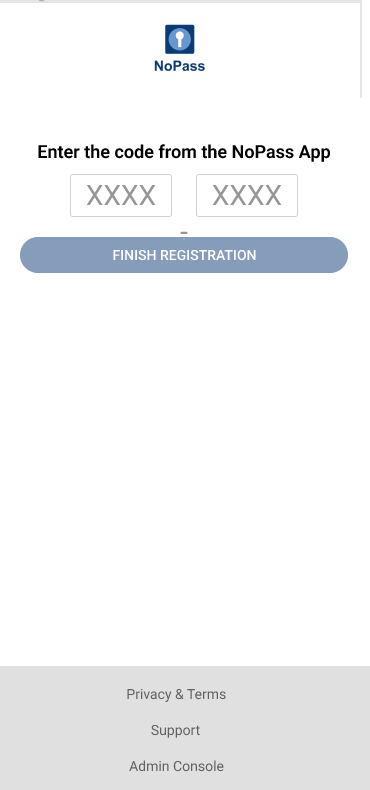
2) The NoPass™ mobile app receives the 8-digit code. Enter the code on the page in the browser and click or tap Finish registration.
ii. On your mobile device, perform one of the following steps:
- Tap Continue to complete your registration.
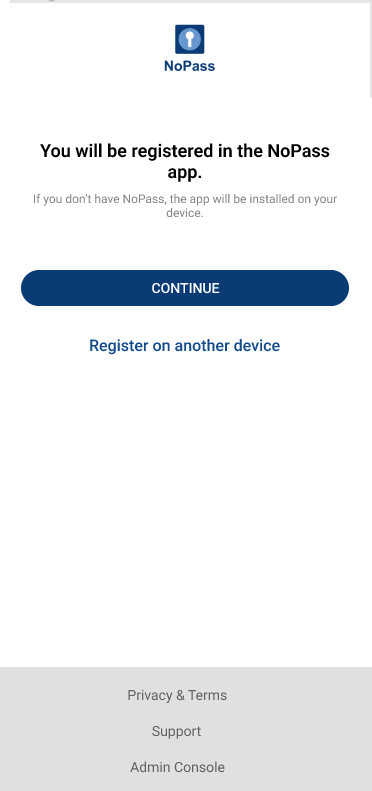
- Tap Register on another device to register the NoPass™ app on your other device.
- Scan the QR code with the NoPass™ app on your other device or tap the QR code on this screen to register the NoPass™ app on this device.
- Enter the 8-digits code into your mobile device and tap Finish registration.
Now you have registered your NoPass™ Profile. After successful registration of your Profile, complete the Payment procedure.
Subscribe to a Standard plan without a trial period
1. If you set up the number of users exceeding 10,000 users, the Subscription shall not offer a trial period. Then, click Buy now.
2. If you already have your NoPass™ Profile registered, complete the Sign in to your Profile procedure. Otherwise, Create a Profile.
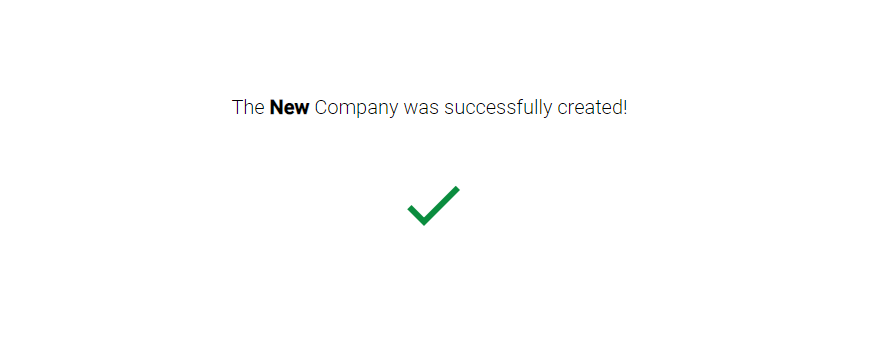
3. Enter the name of your Company and click Create Company.

- 4. After the Company is created, perform the payment.
Payment procedure
Procedure
1. Review the information on your Subscription and perform one of the following actions:
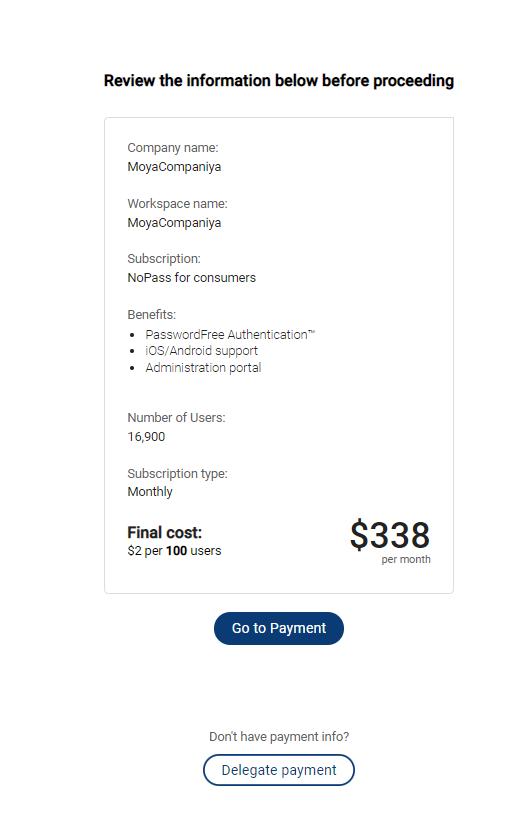
- If you are authorized to perform the payment, click Subscribe.
- Otherwise, click Delegate payment.
2. On the payment screen, perform the following actions:
If you are authorized to perform the payment:
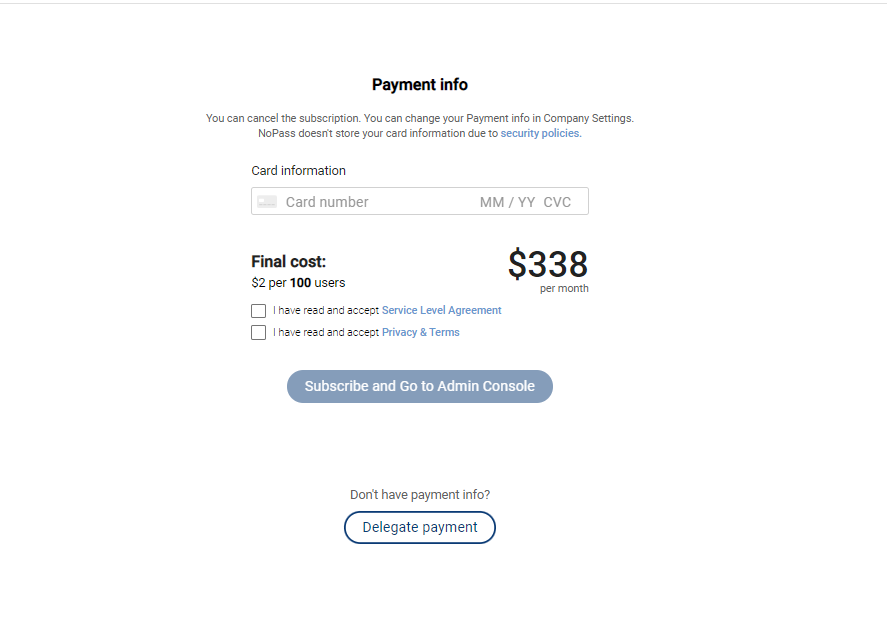
i. Fill in the Card information fields with the payment card details.
ii. Select the I have read and accept the Service Level Agreement and the I have read and accept Privacy and Terms check boxes.
iii. Click or tap Subscribe and go to Admin Console.
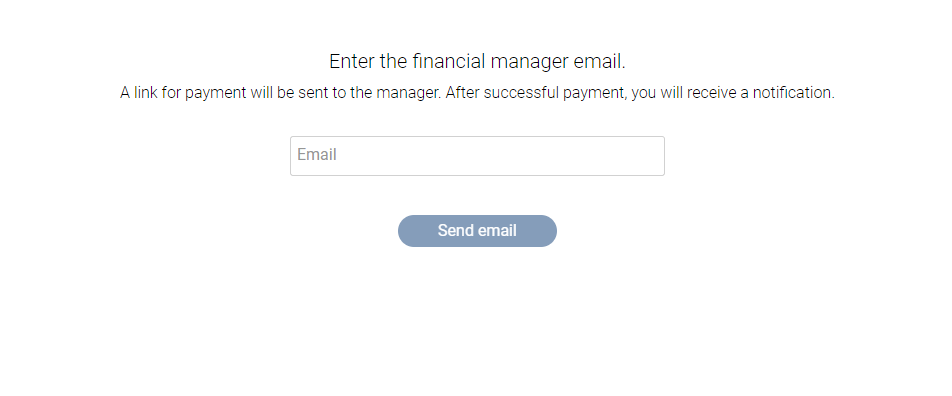
If you don't have payment information:
i. Click Delegate payment.
ii. Type the email address of your financial manager and click or tap Send email.
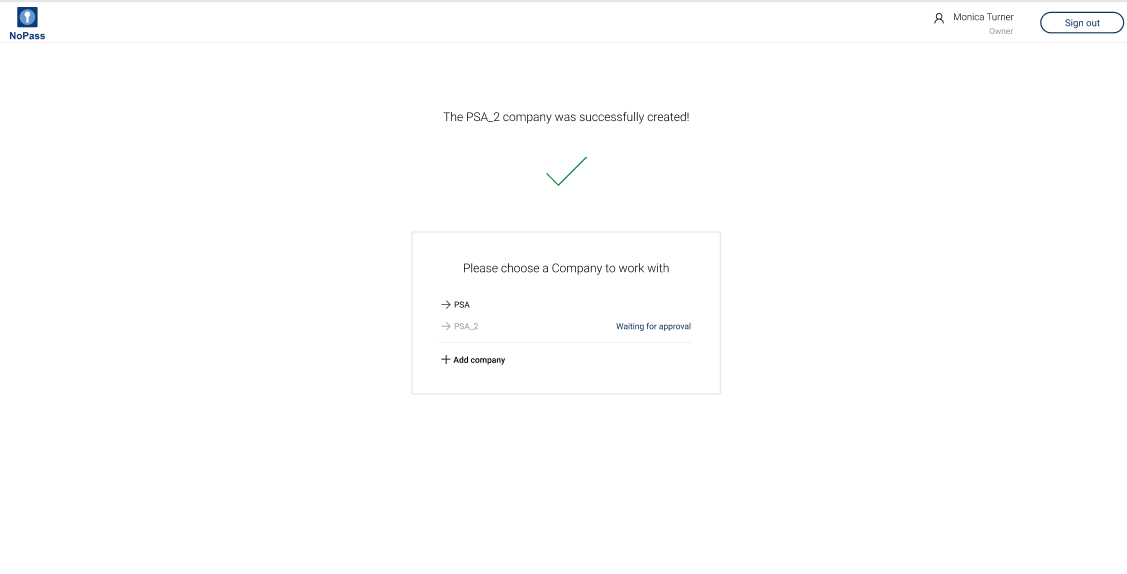
iii. After your financial manager receives the email, they should sign in to an existing profile or register a new profile with NoPass™ (see Create profile) and confirm the payment information. Meanwhile, the Company to be created has the Waiting for approval status.
iv. In case the Owner has deleted the Company with the Waiting for approval status before payment was effected, the financial manager follows the link from the delegation email message and receives the following notification:
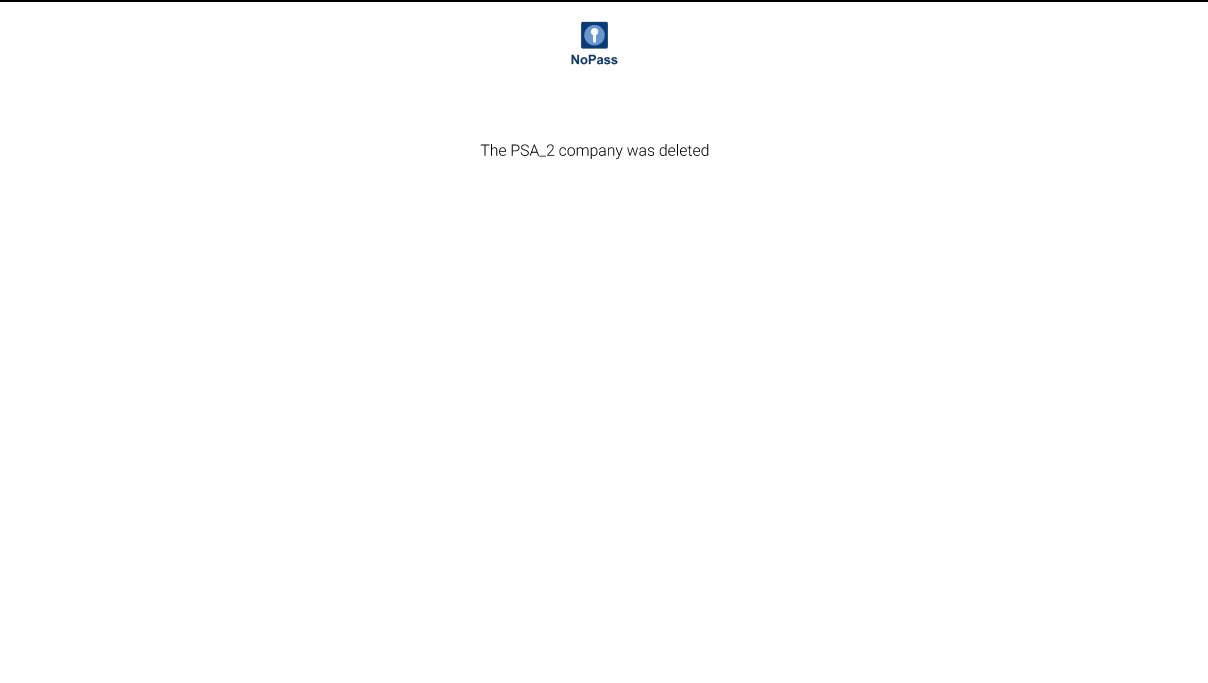
For more details, go to Deleting the waiting for approval company .
v. In case the financial manager is not authorized to perform the payment, they can delegate payment. Otherwise, the financial manager shall fill in the Card information in the following window, select the I have read and accept the Service Level Agreement and I have read and accept Privacy and Terms check boxes, and click Subscribe and go to Admin console.
3. After the payment procedure is completed, your Company is successfully created and you can begin work in your Admin Console.
For more information on Companies, go to Company management.
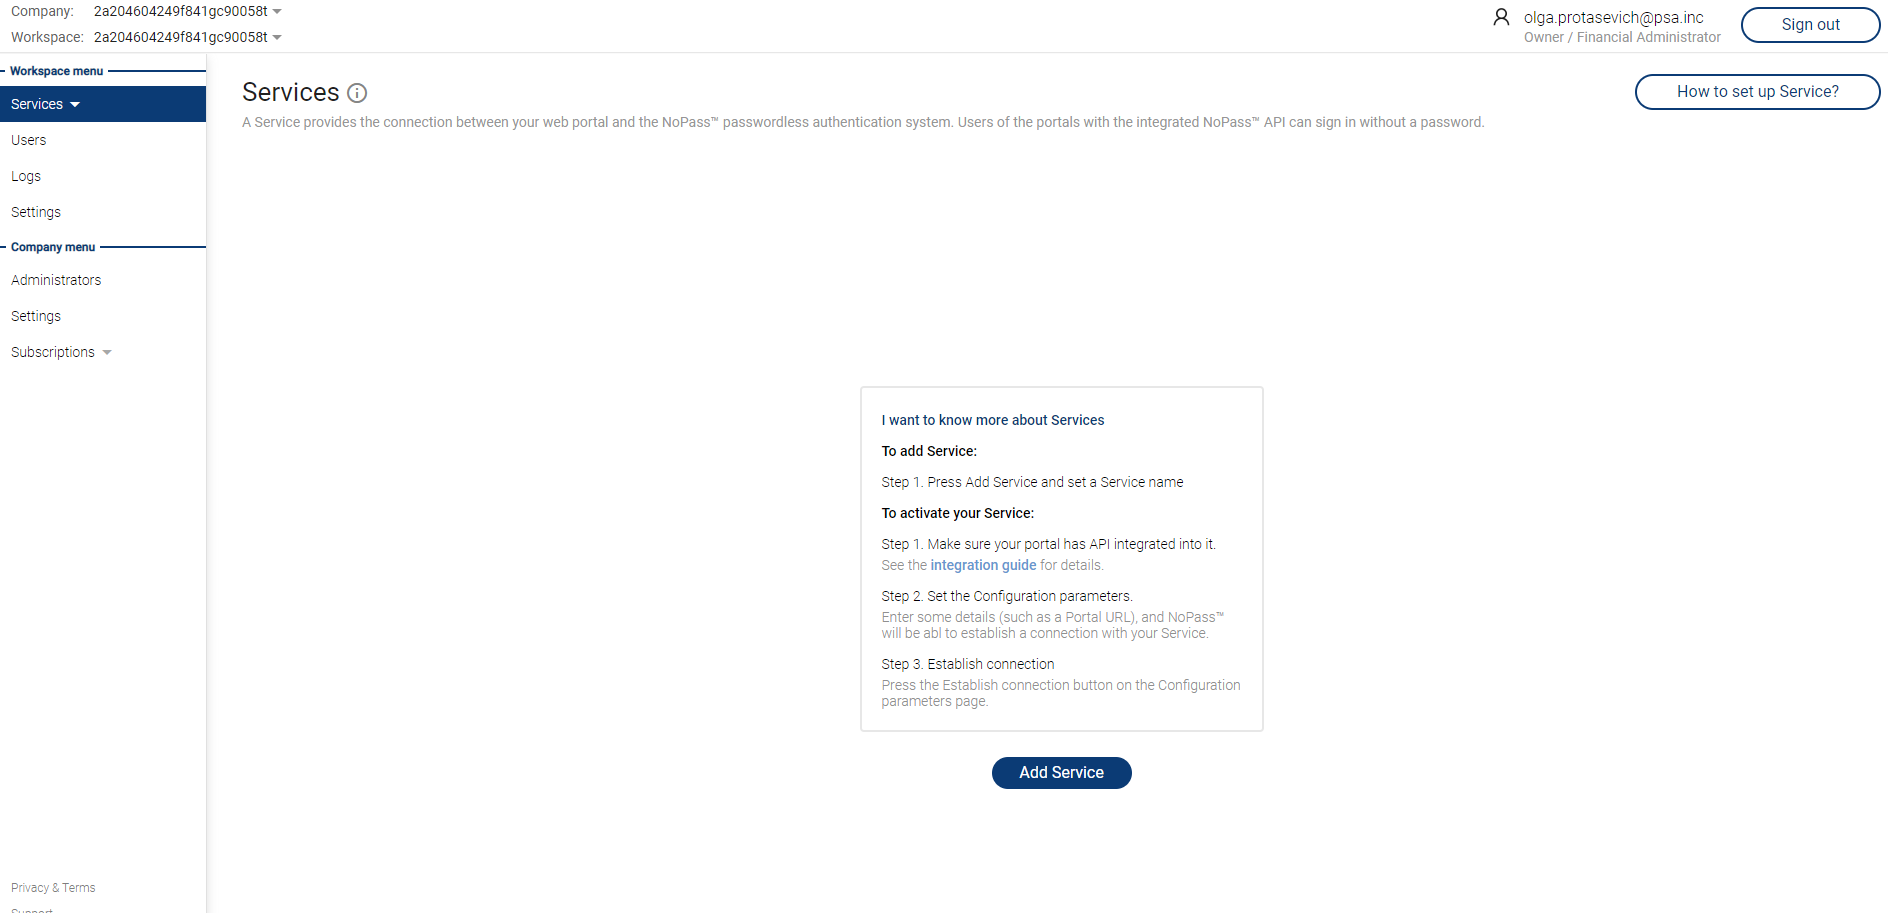
4. After the Company is successfully created, you can proceed with creating Services.
Payment rules
To make your payment procedure smooth and clear, note the following payment rules:
1. The payment for the Subscription is charged in the following cases:
- The Trial period is over. The Owner and the Financial Administrator receive 7-days prior notifications on the Trial period ending.
- The Subscription is renewed subject to the following terms:
i. The payment frequency has not changed.
ii. The payment frequency has been upgraded from monthly to annual billing.
2. If you change your monthly billing period for annual before the current monthly period is over, you will be charged for your annual Subscription after the current monthly period is over.
3. As soon as the Subscription is paid, its status in the Admin Console becomes Active.
4. In case the automatic payment fails, the Subscription status in the Admin Console becomes Unpaid and remains so until the payment is successful.
5. The attempts to effect the automatic payments are repeated during a one-week time.
6. If payment attempts fail during a one-week time, the Owner and the Financial Administrator shall be notified in the Admin Console about the Subscription being past due.
The following notifications are displayed every 10 minutes during the active session that the Administrator has in the Workspace with the respective unpaid Subscription.
- For the Owner with Financial Administrator role and Financial Administrator.
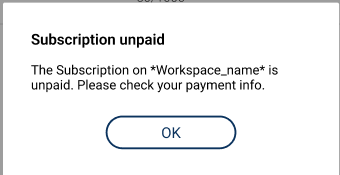
- For the Owner and Technical Administrator.
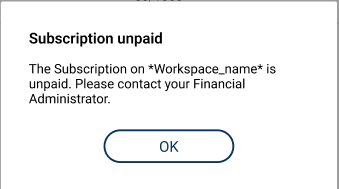
Besides, similar email notifications shall be sent to the Owner with the Financial Administrator role and Financial Administrator every 2 days until the Subscription is paid.
Subscribe to a custom plan
Procedure
1. In your browser, go to the NoPass.us page.
2. Study the information in the Custom plan box and click Get custom quote.
3. Fill in the form and click Submit.
4. After your contact data is received, the NoPass™ Sales team shall contact you to discuss the details of your Custom plan. As soon as your Custom plan is agreed upon, you shall be able to subscribe to the NoPass™ system.
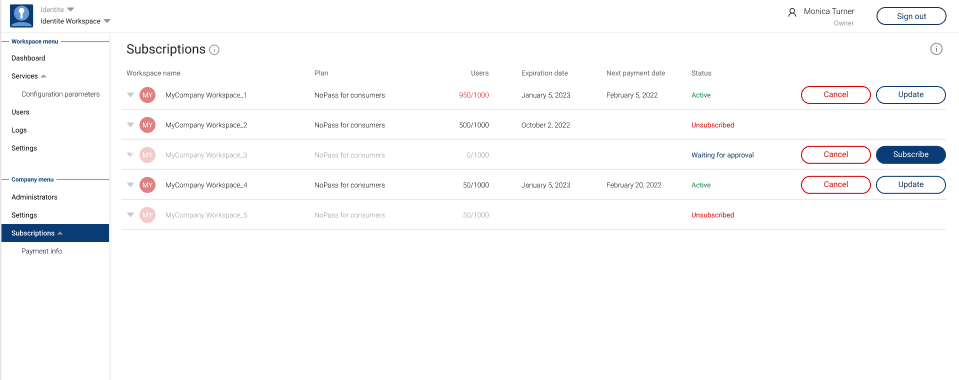
Subscription management
To manage subscriptions, Sign in to Admin Console and click Subscriptions.
Edit payment information
Procedure
1. To edit payment information, click Payment info under the Subscriptions tab.
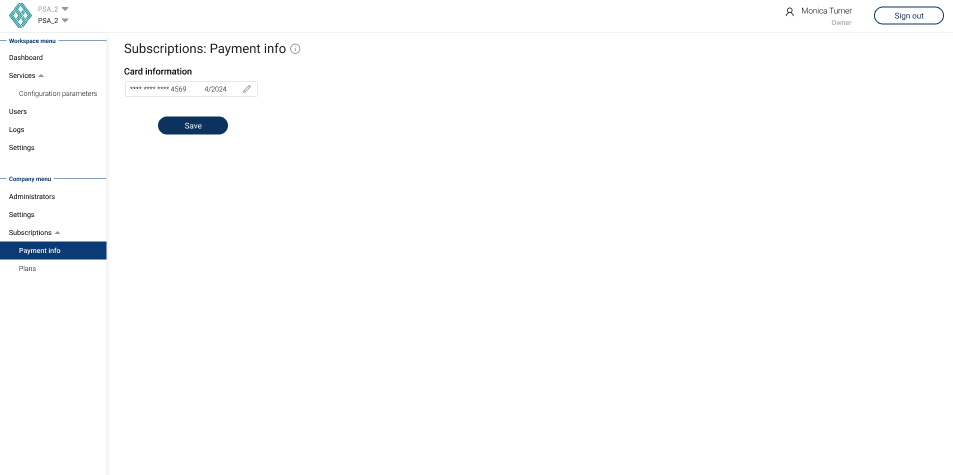
2. To edit payment card details, click the  Edit button, enter new data and click Save.
Update subscription
Procedure
1. Click the name of the Workspace that you want to update. The information about your Subscription plan is displayed.
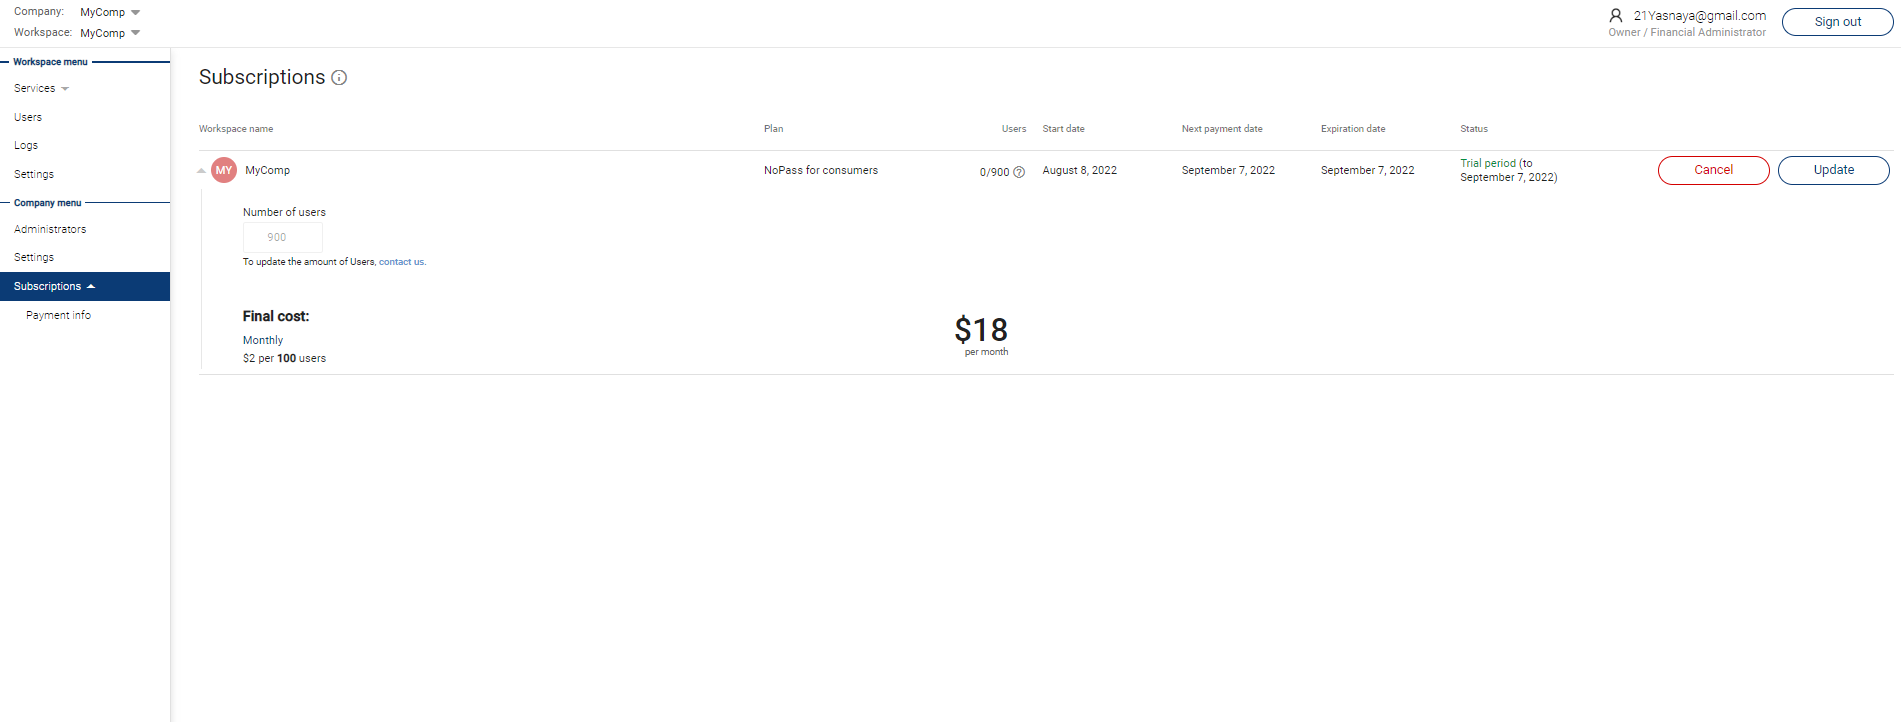
2. To change the number of users in your Subscription plan, click contact us. Then, you are redirected to the Contact us page where you can create your request for the Subscription data update.
3. To update your Subscription, click Update.
cancel your subscription
Procedure
1. Select the Workspace and click Cancel. The following dialogue box shall be displayed:
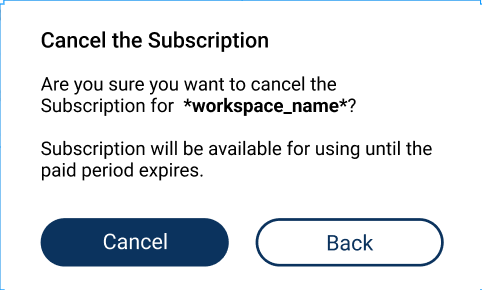
2. If you click Cancel, you will receive a push notification to your mobile device and \ or desktop to confirm your action.
Mobile app notification Desktop app notification
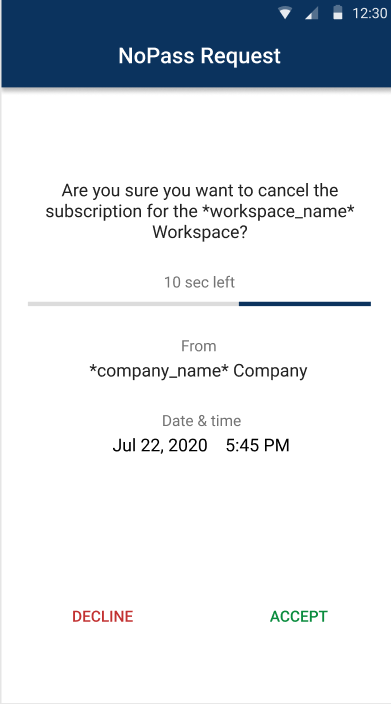
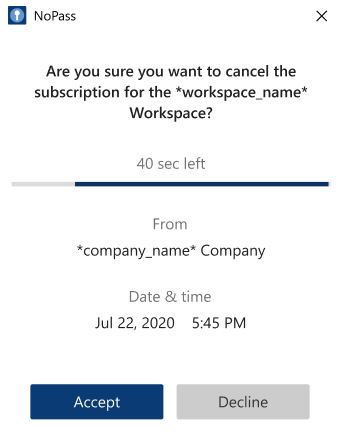
3. After you click Accept in your desktop application, or tap Accept on your mobile device, you will receive a feedback form to provide comments on your decision.
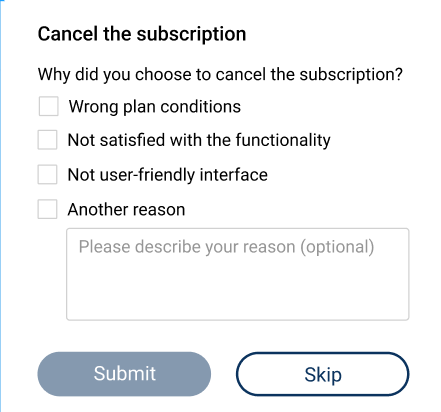
4. Perform one of the following actions:
- Check the respective check boxes with your answers and click Submit.
- Click Skip.
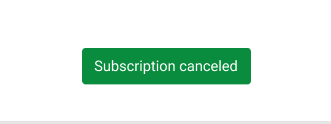
5. After your Subscription is terminated, the following notification is displayed at the bottom of the Subscriptions page.
You still have access to your Workspace and Services until the paid period expires.
The users still have access to the Services of your Company until the paid period expires.
If you terminate your only Subscription, then after the paid period expires, your Company shall be deleted and the Admin Console shall not be available.
Cancel and subscribe
In case the Subscription payment is delegated, the Subscription is in the Subscriptions list and you can either subscribe or cancel the Subscription.
- You can cancel the unpaid Subscription when the Subscription information is incorrect.
- If the Subscription information is correct, click Subscribe and start the payment procedure. After the successful payment, your Subscription shall change its status to Active.
next topic: Administrators
previous topic: Register your Profile